The Filoniverse; the works of the masterful David Filoni, The Clone Wars, Rebels, Ahsoka and Bad Batch. With the number of episodes these all encompass, it is no surprise that Shatterpoint has released lots of characters from them, although up until now, they have primarily focused on The Clone Wars. As much as I adore the series, for me, Rebels is the best of them all. It is set during my favorite time of a galaxy far, far away and the storytelling shows just how much Filoni learnt during the making of Clone Wars. Now while we have had some of the villains from Rebels, we have not had any heroes. Thankfully, Atomic Mass have rectified this with now one, but two sets: Make the Impossible Possible Squad Pack and Stronger Than Fear Squad Pack. Together the two give players the ability to field all members of The Ghost.


It seemed silly to try and do two different reviews for these releases. I can’t imagine there are going to be many players who are not going to want both sets, to try playing both sets together. That said, I do appreciate how they are split, for if you are a fan of Ahsoka, then the characters in the Stronger Than Fear pack are going to be relatively unknown to you (In Ezra’s case visually), whereas in the other set, the characters fit in almost seamlessly. I imagine this is why the sets have been split – in part – in this way.
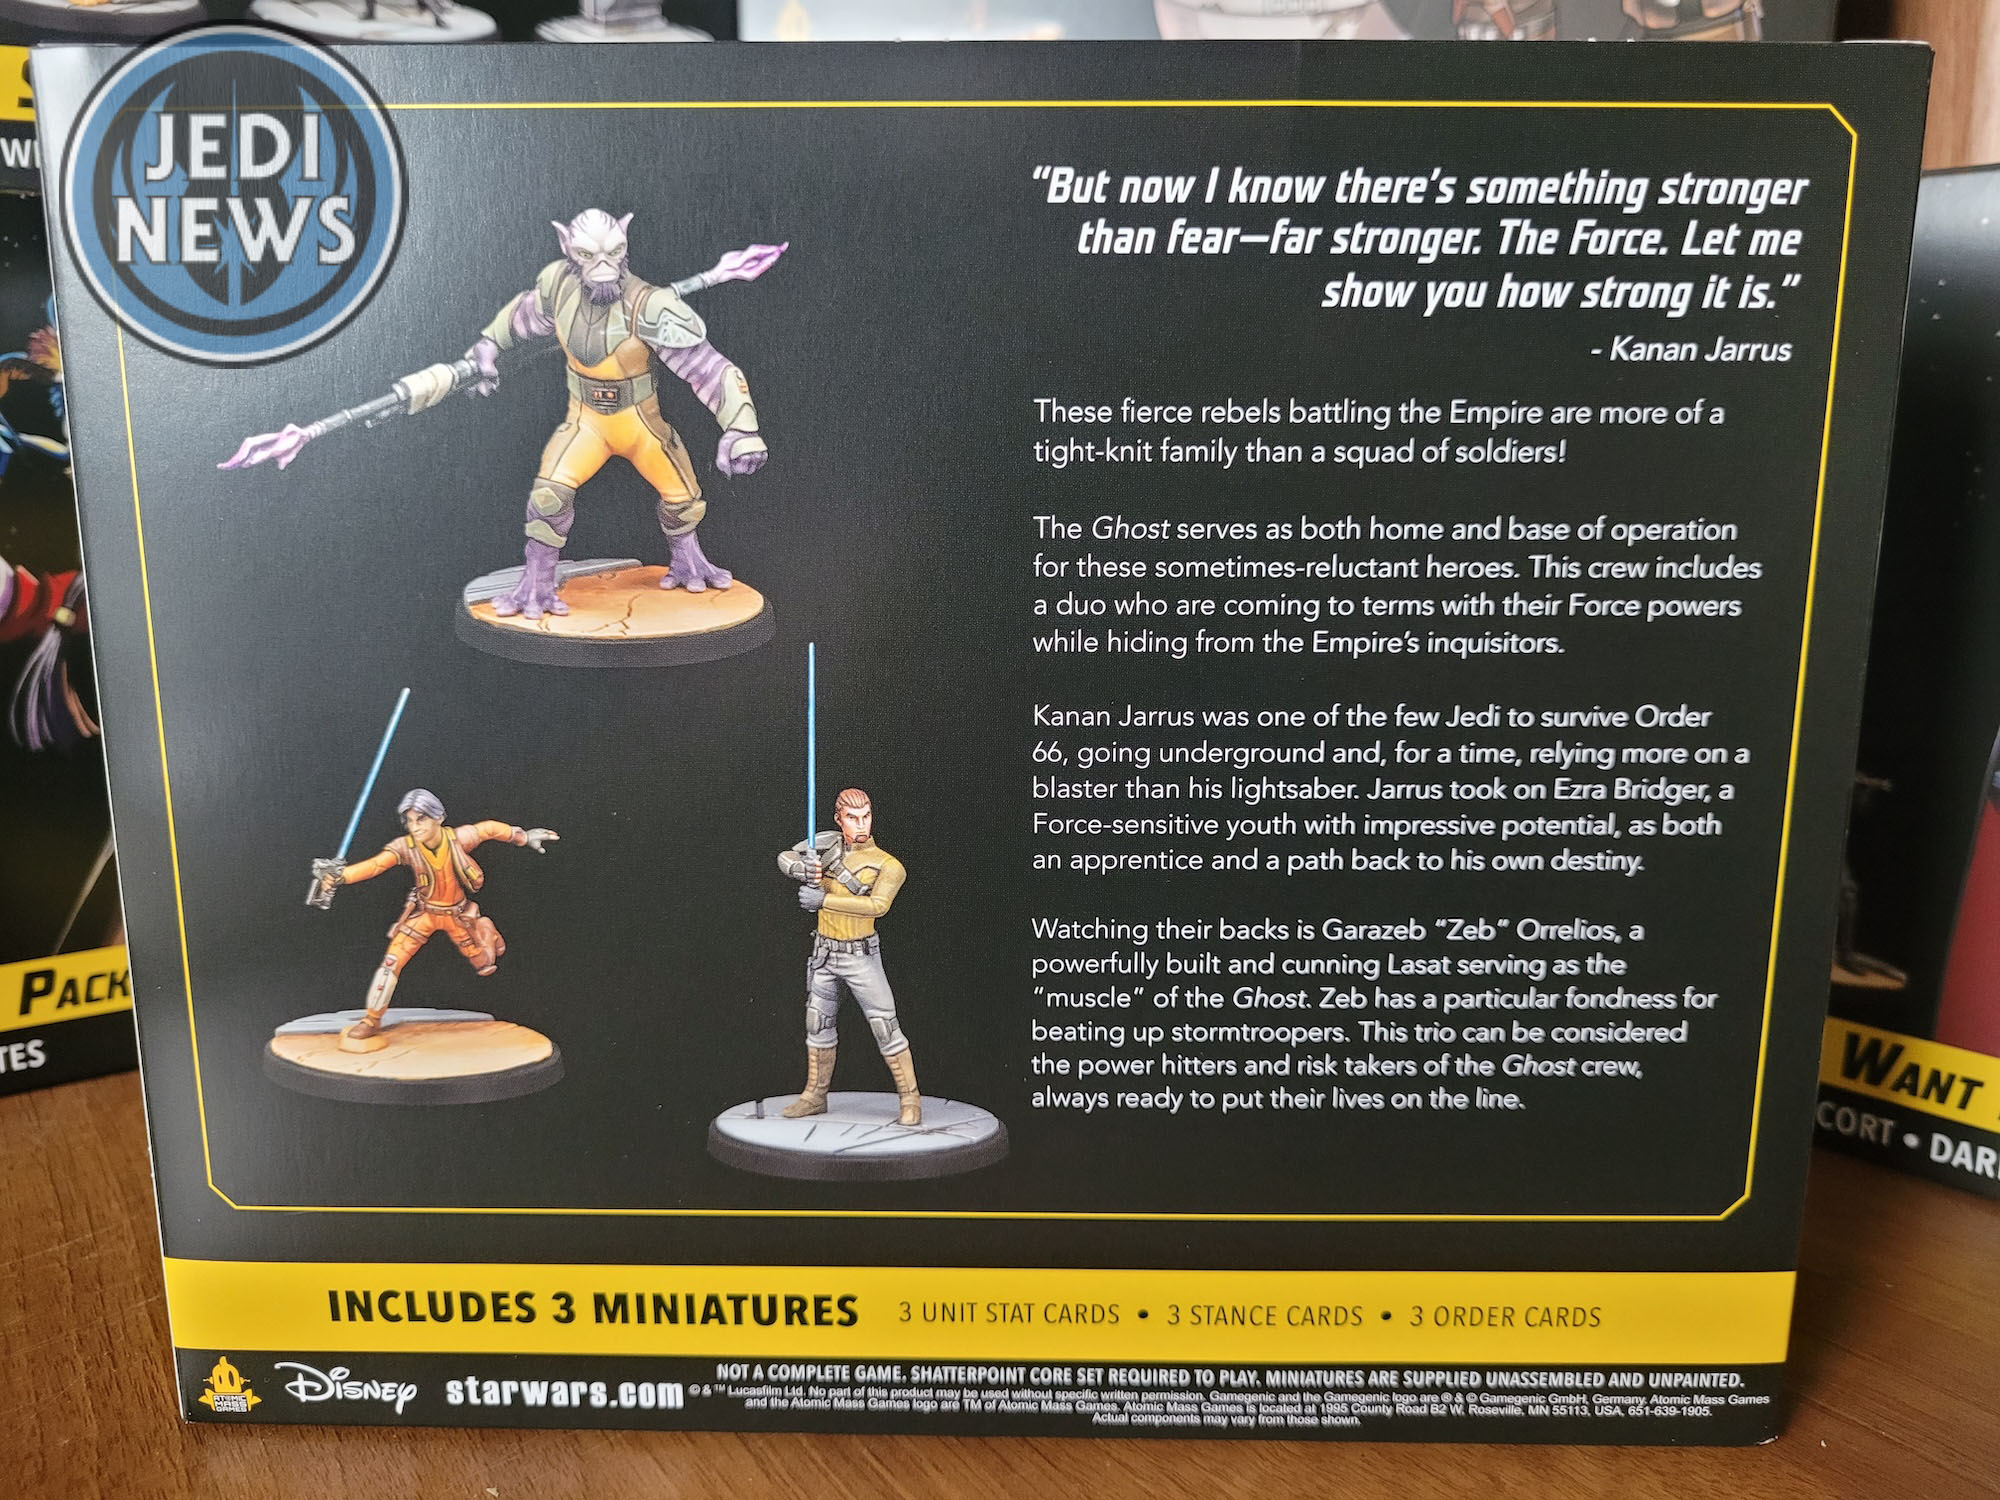

With both sets you get three characters that make up a squad. I talk about having only three characters in a box in my Certified Guild Squad Pack, which I won’t repeat here. Suffice to say, you’re buying a squad and one less model doesn’t mean much less within the box. The artwork on both boxes I think is exceptional. Some of the artwork choices for the boxes and cards don’t always grab me, but when it works, it really works and these two are some of the latter. Kanan’s eyes look fantastic, and you get a real sense of the character of Hera from the artwork. I do want to mention one thing about the boxes, or I should say one of the boxes, which is the back of the Make the Impossible Possible Squad Pack. It mentions that Sabine has an alternate head that you can use. While it’s great that Atomic Mass mentioned it, the fact that there is an image of the model on the front of the box, would it not make sense to put the alternate sculpt on the back for players to see? Just an idea!


On opening both boxes, you get everything that you do in these sets: the sprue with the miniatures, the bases, the cards and the leaflet explaining where you need to go to get the assembly instructions. So, let’s get building! I’m going to start with the Make the Impossible Possible Squad Pack. With the instructions loaded up, you start by constructing the primary: Hera.
Hera is relatively simple to put together. Her body actually snapped together so well for me that I couldn’t even separate it to glue it properly together. Everything fits well together but I would suggest that you place the arms before the head, as Hera’s Lekku can get in the way if you do it the other way around. The model itself is simple yet effective. Most of the time Hera is piloting the Ghost, so it makes sense she’s a bit more static than some of the other characters. In fact, when you look at the characters altogether, you can see it’s the younger ones, the ones who are less collected, that are in the most dynamic poses. I don’t know if this was intentional, but it certainly gives a parent vibe to Kanan and Hera, the way they stand still.

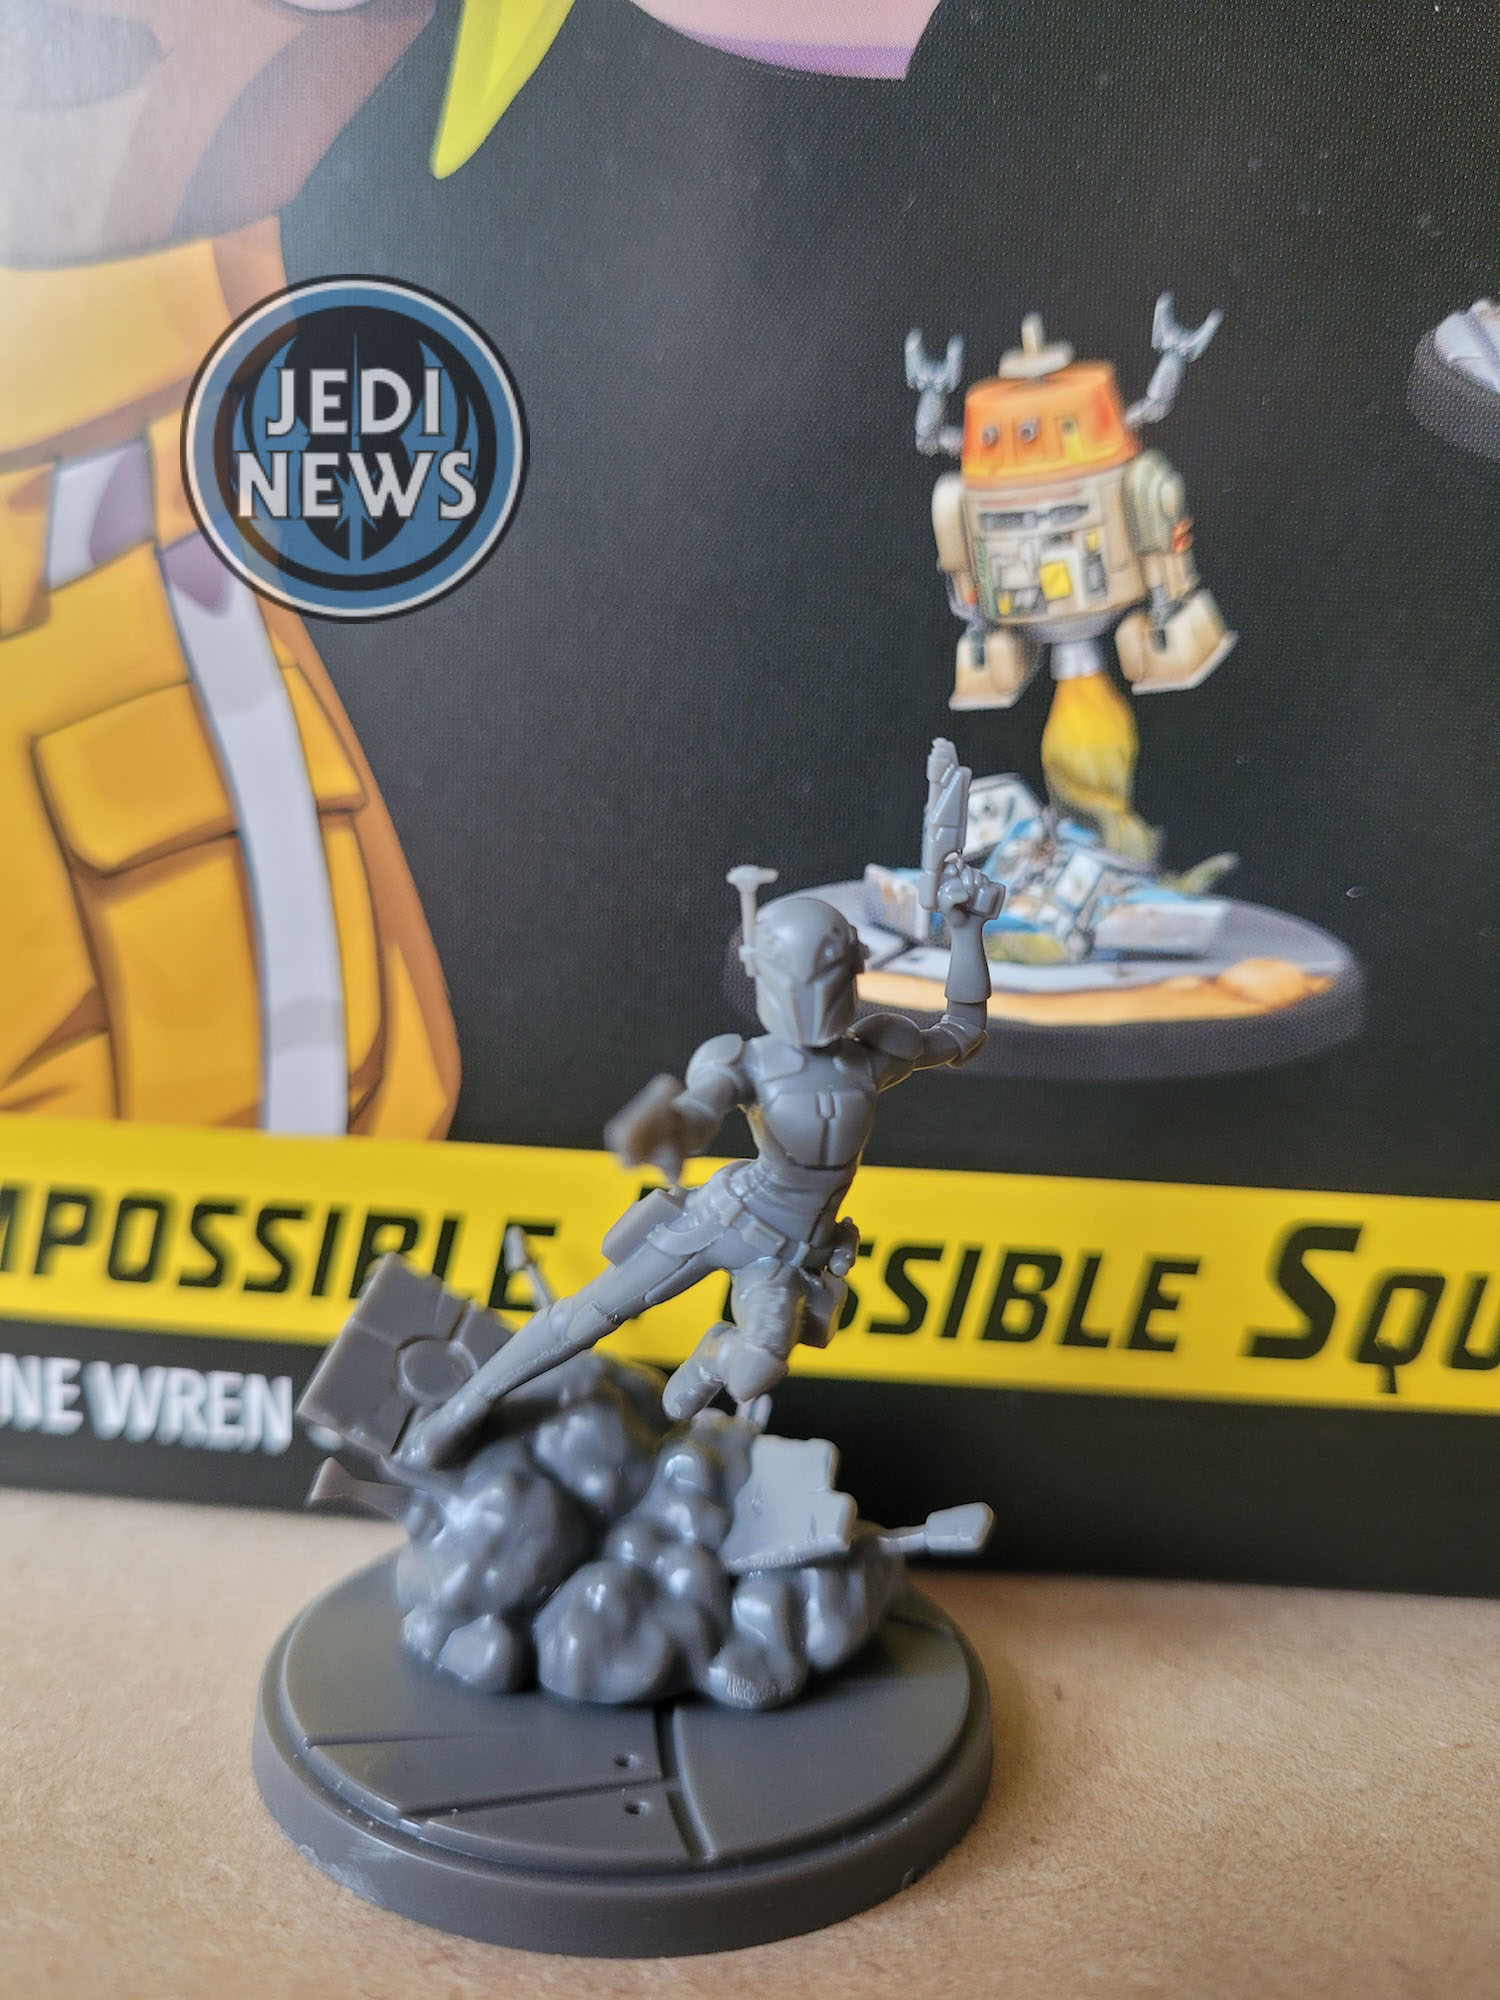
Next is Sabine. Let’s start with the big problem. Sabine has two head choices: helmet or unhelmeted. While I like the principle of choice, this is a very difficult one. The clones, well, they would never go into combat helmetless, simple. Sabine – now that’s another matter, she does both. Both head sculpts here are fantastic. The facial head sculpt looks like Sabine and the helmet is spot on to the one we see in the shows. What is a player to do!? I decided to go helmetless to make her slightly different to the Mandalorians, as I’m sure I’ll be running her at some point with them. The fact that you can see the rest of the faces of the squad when lined up, I think I’ll want to see Sabine’s face too… that was until I placed the helmeted version on. The face works great, and I do love the sculpt, but with the helmet on, been thrown by an explosion, for me the model just looks right. Oh, Atomic Mass, you don’t make things easy! Other than this rather difficult decision, the model builds together perfectly and shouldn’t cause you much stress – except for the choice of head. The model itself is the perfect expression of Sabine: explosions. It’s full of movement, action packed and sees Sabine in the thick of it.
Finally, from the first box, is Chopper. I adore Chopper, he’s so loveable and exactly what a droid should be in a galaxy far, far away. He is extremely simple to put together and looks great. The detail on him is amazing and then coupled with the damaged droid base (which is rather gruesome for the poor droid in question yet equally as detailed as Chopper) and you have my favorite model from this particular set.


Then we move onto the Stronger Than Fear Squad Pack. When I quickly checked through the instructions, I noticed that Zeb had an alternate build! Rather surprising as there’s no mention on the box, unlike with Sabine’s helmet/face choice. I wish these things would be clear on the box, if not for myself, at least for other plays. I actually prefer the alternate build to him – but more on that later.


First up is Ezra for the build. The first part is fairly easy: body together, legs together, head together. Then placing the head on the body. It has a slight groove to help get it in the right position but oh how I wish Atomic Mass would just use a solid peg, it would make things so much easier. Gently move it about a bit and you should find the right fit. The one thing I did was steps five and six before attaching the arms. While the arms are quite wide, I find any pouches or holsters are far easier to do without arms getting in the way. The model itself I really like. Ezra looks a little wonky, yet I feel this is completely in keeping with the show, where he’s still trying to find himself. His balance, almost looking off, is very Ezra. The detailing on him is superb, the back of his jacket looks amazing. Yet for me none of that matters if you’re not able to get the cheeky grin. This model gets it spot on. There is no-one else this can be other than Ezra.


Next, it’s onto the master, Kanan. Simple and straightforward. The arms should be the only thing to be problematic, yet there is so little give in them, even this can be done easily. The right arm with the shoulder pad is certainly the most secure of the two, this is the one to glue first. Then glue in the second arm and you should find the hand joint will actually click into place. The completed look I love. As I previously said, along with Hera, Kanan having a static pose feels right for the character but also as part of the group as a whole. The face, like Ezra’s, captures Kanan to perfection.
Finally, it’s Garazeb Orrelios – definitely Zeb as I’m not typing that every time. Zeb has two ways to go with the design. The first is with the bo-rifle extended that is featured on all the box art. Now, I remember thinking when I first saw it, how cool but that could be annoying during games. The rifle is a lot larger than the diameter of a base, so as cool as it may be, it could get seriously in the way of gaming. Also, when I think of Zeb, it’s actually with the rifle as – well – a rifle. A lot of the artwork for Rebels is with the rifle in this configuration. So, to have the option was a pleasant surprise when I opened the instructions and one that I’m a lot more sure which version I want. After all the assembly on thinner characters, you really notice the bulk of Zeb. That extra bulk really makes assembling really easy and the finished model is stunning. Although I liked the model, having now seen him size wise, he’s my favorite from this box. The rifle folded I also think is very Zeb and I’m so pleased that the option is available to players. It definitely gives the, ‘no one better mess with me’ look. When he’s actually on the base he is an absolute beast, I think he’s going to be a huge amount of fun to paint.


With all six characters assembled, you can see just how fantastic they look as two squads. It’s Rebels come to life. But having them visually stunning is one thing, but how do their cards look? Can they all be run altogether (a helpful entry point for new players if that is the case), or are they better split and used in conjunction with a different squad?
Let’s start with the ‘Make the Impossible Possible’ pack and the primary first. The two sides of Hera’s stance card are ‘Difficult Choices’ and ‘Spread a Little Light’. The first gives Hera a slightly better bit of protection in melee and can put out up to seven damage depending on dice rolls. No matter the side, she’s always trying to add criticals to her roll, useful if the enemy gets a good roll. The other side is the more interesting. Slightly less damage but is dashing more and healing lots. This seems more in keeping with Hera and I think means I’m going to have her close to other characters. In terms of abilities, she has a tactic that activates at the start of her activation. A Rebel Alliance unit may dash. If the unit is a Spectre unit, they can advance instead. This will be a common theme amongst the crew of the ghost. They are there for the Rebel Alliance and running them with units that have the keyword is essential. The Spectre keyword helps to give those abilities an extra little bonus. Nothing over the top, but a bit of extra flair. It seems the perfect way for these characters to work well with one another but not isolate them from being included in other squad lists.
‘We Will Not Stand’ is an ability that Hera has on her stance card. It allows a Rebel Alliance unit to remove a wounded token, all damage and one condition, to be replaced by an injured token. They can then move towards an active objective. This is quite powerful, particularly if that active objective is crucial to winning the round, as well as getting the wounded unit back into play quickly. However, it does cost two force. Hera only provides three force (as done Kanan), so if you’re running a full Ghost crew, you’re going to have to think carefully if and when you use force. Hera provides Rebel Alliance units within four cover, handy. However, it’s Hera’s identity ability that really lets her shine. At the start of her activation, you can spend a momentum. Every rebel within five can heal three and remove a condition. If the activation was because of the Shatterpoint card, you don’t have to spend the momentum. This is very powerful if used correctly. I love Hera healing other Rebels and aiding them in the fight, like a true leader. I can see this ability being game changing and I’m very excited to see how it plays out.
Sabine is the secondary, costing four. She – like Hera – also has a tactic: ‘My Friends Make the Impossible Possible’. A Rebel character may dash and if they’re a Spectre unit, they gain hunker. With Sabine and Hera together, you should be able to get these units moving quickly around the board. ‘I’m Gonna Go Add Some Fireworks to The Celebration’ costs one force and can be activated on Sabine’s stance card. Sabine can choose an objective within four and roll five attack dice. Units within two suffer damage depending on the dice roll and then Sabine can jump. Now it’s very Sabine but also has to be used carefully as this doesn’t discriminate between enemies and friendlies. Any time Sabine moves, if she is then within two of a Spectre unit or Mandalorian (great to see this mentioned here), she focuses. If this wasn’t enough, she has protection, sharpshooter two and any time of movement she can jump instead. There is a lot going on with Sabine that makes her look like a very tempting four cost secondary. Her stance card can cause a maximum of eight damage with lots of shoves. Throw in some Beskar armor and Sabine looks like a great unit to run.
The supporting unit, Chopper, also costs four. His stance card sees him rolling eight dice for melee, causing up to six damage. It doesn’t seem too powerful, yet at the end of his combat track, he can choose to use two different abilities. Both cost a force and are called ‘Mayhem’ and ‘Rocket Booster’. The latter is pretty obvious, he can jump. Mayhem, you roll three dice, depending on the roll sees you placing condition tokens on your opponent. Get three different symbols and your opponent is not going to be happy as they’ll find themselves with three conditions. If Chopper manages to wound a unit, a Rebel unit within two may dash, unless they’re a Spectre unit, in which case they can move. Along with protection and a couple of immunities, Chopper also has an amazing ability. While his card is in the order deck or reserved, he can’t be targeted by ranged weaponry. Talk about incredible. On a high point with an objective Chopper will most certainly want to be activating last.
As a squad box, I’m so excited to give these three a run. Not only that, but I don’t necessarily need them all together, they could form a Rebel Alliance Squad with other units. I like that flexibility with them. But it isn’t just the three of them, for we can do a full Spectre grouping.
Kanan is the other primary, providing eight spending points and three force. The two sides of Kanan’s stance card are ‘Pack Leader’ and ‘Form III Soresu’. Although technically a Jedi, it’s great for Kanan to have such a strong ranged side. ‘Pack Leader’ can deal out ten damage. It has lots of movement but also heal if you need it. His lightsaber side, while not as much damage, allows you to place conditions on your opponent as well as activate the ability Force Push. Not that this ability needs much explaining. Two force and Kanan can push an opponent away. His tactic ‘A Man with Two Names’ is really going to make you think of the unit’s stance card. If it’s Form III, you can refresh a force and heal the unit. If It’s ‘Pack Leader’, a Rebel unit can dash or advance if they’re Spectre. Very useful and flexible. The force refresh is certainly going to be a popular choice if you’re running a full Spectre team. Kanan has deflect and also his Identity ability called ‘Now I Know There’s Something Stronger Than Fear’. When a Rebel Alliance unit is wounded, Kanan can heal two, jump and – if the wounded unit was Spectre – can make a five dice attack. Kanan seems like a solid primary. While not having lots of unit abilities, I think he’ll provide a reliable character in a squad. This is precisely his role in Rebels, and I think the designers have really got this side of the character just right.


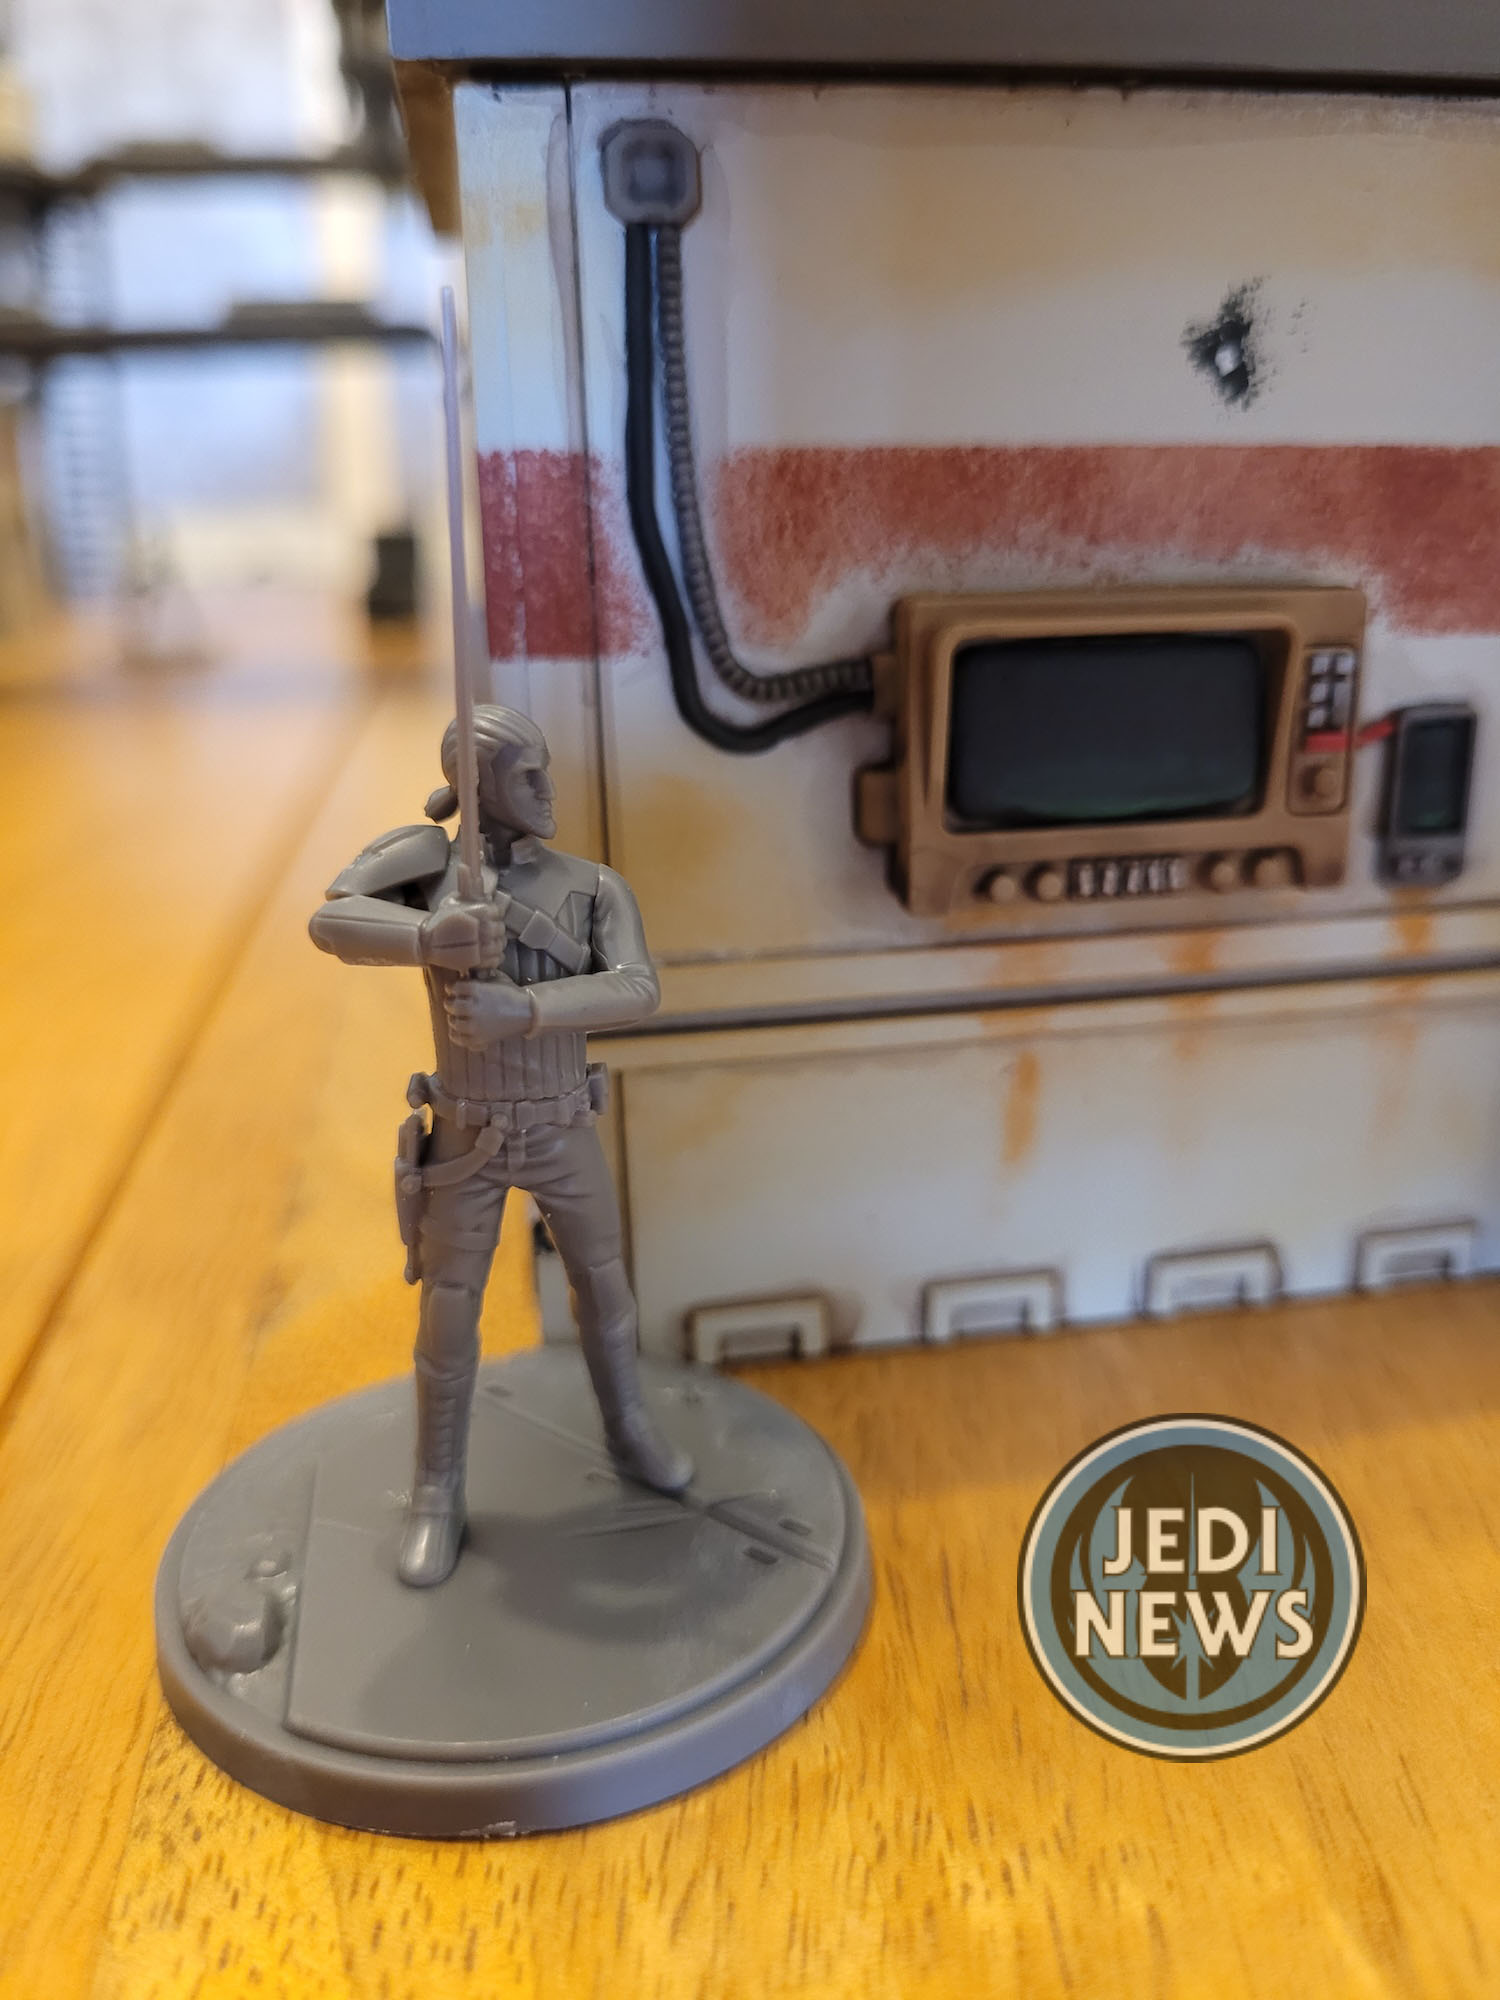
The Secondary is Ezra, costing four. Now Ezra as secondary. I mean it sort of makes sense, apprentice, master but there’s a part of me that thinks Zeb should be the secondary over Ezra. In terms of squad building, I think this way round makes more sense and hopefully will allow more options for Zeb to be in Rebel Alliance squads. Ezra’s melee is slightly better than his ranged, causing a maximum of eight damage, or seven ranged. A few conditions, movement and shoves, Ezra’s track is a good solid one to have in a squad. In terms of abilities, he has force jump for a force. Also, for a force is ‘Unreliable Informant’ where Ezra can target an enemy supporting unit and with the right dice role can either dash them (Ezra moves them) or they become pinned. This works very well with another ability of Ezra’s that when he wounds a supporting unit, you can gain an additional momentum. If a primary force unit finished within two of Ezra, he can jump, if there is tie for an objective, Ezra wins. Ezra is clearly wanting to be going to support units. While he will work well with the Rebel Alliance, Ezra would work very well with two primary force units too. I’m already thinking how I might run him in a completely different set of squads…
Finally, it’s Zeb. He can only out out six damage on his stance card, but he’ll do a lot of shoving and moving while he’s doing it. I’ll be honest, I was hoping for a bit more from Zeb in regard to his stance card. I thought there would be more damage. Abilities, for a force, he can use ‘This Is Gonna Hurt, Pal’. This targets a Rebel unit within line of sight. That unit may dash towards Zeb, or if they’re Spectre, they can advance. If Zeb is engaged, he can then focus. He also has ‘Lasan Honor Guard’, which when he becomes wounded, he gains two injury tokens, removes a wound token, all damage and one condition. Helpful for contesting objectives but that’s a lot of injury to take, depending on when in the game he becomes wounded. For a force, Zeb can make a second, five dice attack on a unit he just attacked. This seems useful as I know a few games where I’ve been frustrated by not being able to finish an opponent’s unit. Finally, once Zeb has an injured token, he can’t be held in reserve. This does seem in keeping with how Zeb is in the show. I think for me, I’m a little underwhelmed by Zeb. I’m not sure what I was expecting, but something more in line with the Dark Troopers, a reliable tank! That he certainly isn’t. Maybe he’ll do himself proud when on the battlefield.
As a whole team I wonder how well these guys are all going to work. I’m excited to see it. What I do really like is that they all seem like they would easily be able to ignore the Spectre word and be able to fit alongside other squads that are Rebel Alliance. While they get some benefits – and only some – for working all together, it isn’t crucial. These two packs are really going to be a boost for Rebel players, creating some variety in what they can pick, in mixing up their units a bit.
But all of this is hypothetical until we try them out on the table. How do they actually perform? Of course, I’m playing them together. The first thing you notice is how well they all move together. All the tactics are about moving each other along. Although it can feel infuriatingly slow at first, what becomes very evident is that they are all together as they move. You haven’t got a lone wolf miles ahead, they are all fairly close together. It works very well with Chopper because if you can use the tactics to move him into position onto an objective, he can just sit there, keep his initiative card out of the way and no one can shoot him. Exactly what I did, and my opponent couldn’t get to him without having to face my other characters first.
My favorite character was easily Kanan. This guy can really hit when it counts. He did eight wounds in one go, wounding a unit and moved like there was no stopping him. It was incredibly impressive and although I didn’t think I’d underestimated him, he’s certainly gone up in my esteem. I love how he plays just like he does in the show, coming in when it counts and really turning heads. Not only that, but when Sabine got wounded, Kanan went ballistic, attacking his opponent and pushing them back off an objective. It felt so cinematic, like I was playing through an episode of the show.
When I started to look at the damage output, Hera and Kanan in particular, can really put down a huge amount of damage into characters. The others are not as powerful, but I’m ok with that. They seem to work better running around the battlefield, whittling the opponent down and securing objectives. If there is any unit being particularly bothersome, then you send Hera or Kanan in. It works well and the squad feels like they work like they do on the show. I always kept Chopper out of the way and close to others so they could step in in case my opponent got any other ideas. That’s not to say Chopper isn’t powerful but I love that he’s a guaranteed objective if you use him right with the tactics of the others.
Every time I pulled the Shatterpoint card I used Hera. It works so well, means you don’t sacrifice a momentum and as the whole team stays relatively close together, it’s fairly easy to have it work at its most effective. Her and Kanan are really strong leaders and for the most part I think I will keep running this whole group as a team. That said I keep looking at the different characters thinking how they might fit into a normal Rebel Alliance team. Ezra and Kanan with Luke?


The only character that failed to impress was Zeb. He just seemed slow and not contributing much to the rest of the team. He would be one that I’d replace with another unit that maybe has two characters in the unit to allow me to cover more ground. I’m not quite ready to give up on him yet and perhaps he’ll surprise me in future games.
I have to say that I am over the moon with these two boxes. They are a joy to behold and a joy to play with. I can moan about Zeb but even with this, the whole squad works incredibly well together. They are a team that moves around quickly, supporting one another and having each other’s backs. I feel like I could be talking about the show as well as how they operate in the game. The designers have got these guys spot on. There is such a cinematic quality to how these characters operate on the battlefield, Kanan going all out when someone else is wounded, to Hera swooping in with a bit of healing, to Ezra jumping around like crazy. It’s wonderful to watch, let alone to play with. If you’re a fan of the show this really is a no brainer of a purchase. If you are a Rebel Alliance player, I also think you will find that one or two of these units may really change the dynamic of your squads. These are a lot of fun to play with, dare I go so far out on a limb to say that these are my absolute favorite units I’ve played with so far, even more than the Ewoks! They are just that well designed and thematic. If you can’t tell, these two squad packs have really hit that sweet spot for me.