


Last year, I’d had the joy of reviewing the starter sets for the Rebellion and the Galactic Empire. To say I was impressed with both sets would be an understatement. Both offered unrivalled value for money as well as an update to the rules and cards that meant that the game played and flowed more easily than it had when it was released several years previously. I was eager to see if the other two starter sets, that were released after the initial two, were just as impressive: The Separatist Alliance and the Galactic Republic. For this review I will be looking at the Separatist Alliance set but stay tuned for the Galactic Republic review to be hot on its heels.
As I mentioned in my first starter set reviews, my son – Charlie – and I had initially played the game when it had been first released. It was a game that still needed some fine tuning and while we enjoyed it, it was very long winded, and game play was just unmanageable when the most we could manage were two hours of game play at a time. Because of that, we only ever played with the Rebels and Imperials, who were the first sides to be released. I was very excited to actually get around to playing the other forces to see if their gameplay styles were noticeably different.
But what was I expecting the game style of the Separatists to be? With all the other starter sets (the Republic included), I assumed it would be about the same numbers of models in a squad with similar numbered squads. For the Separatists I was expecting something far different – either more models in a squad or more squads in general. For them, numbers were everything, they should overflow their enemies but not be able to deal much damage in close quarters and rely on shooting at a distance. I guess I was thinking something like the Tau in Warhammer 40 ‘000. It is this set that should feel the most unique out of the four factions.
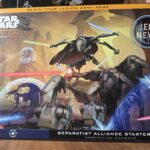
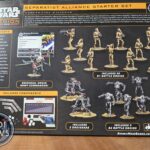
Looking at the box would give me some clues to if this would be the case. Before I could even check the contents however, I had to stop to look at the artwork. On all the starter sets, the artwork that they have used is tremendous. It just captures the spirit of the game as well as the factions. My Darth Vader from the Imperial set has been based to try to capture the artwork; I’m taken with it that much. After that slight distraction, I turned the box around to find the contents: General Grievous, two droidekas, nine B2 battle droids and… thirty (yes thirty!) battle droids. That was a lot of droids! My thinking of their playstyle sounded like it might be right. What I really like about the contents is that yes, there are a lot of battle droids but there is also a lot of variety. Three different types of droids as well as Grievous. While I’m sure I’m going to get fed up with painting the standard battle droid, the variety is great to see. You might notice on the photo the one mistake on the box. If you read the contents paragraph it says there are thirty-nine models, if you look at the list, it says forty-two. It is the latter and that is the most models in any of the starter sets, this is certainly value for money.
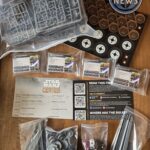
Eager to get started with the set, I opened it up. Like the other starters, this box is jam packed full of everything you need to start playing Star Wars: Legion. Scenario cards, dice, measuring sticks, VP board, models, bases, a standard 600-point recon list to use with the set, upgrade cards… it just goes on and on. On that note I do want to say just how good value this is for £84.99 RRP cost. While that is the standard cost, some easy shopping around and you are getting a huge force with everything you need for around £70. That is incredible value. While the sets work all by themselves they are also a great base to build forces up from. I’d be happy with that just for the units, yet the fact it comes with everything a starting player needs to jump into the game is insane. I’m not quite sure how AMG have managed it but I – and I’m sure most players – are not complaining.
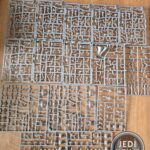
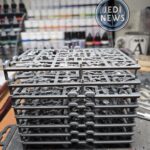
I wanted to start building the models, I wanted to get straight to it – particularly when I saw the tower of battle droids looming at me. It felt like looking into the middle of an MTT transport. But I have also learnt with my very short time with Legion that it is best to look at the cards first in case any units need building in a certain way. There are a huge number of cards, covering several different languages. I quickly sorted the English language cards and started to see what these units were like.
Let us start with the general – General Grievous that is. He is 130 points and comes with eight health. What I immediately like about Grievous is that he isn’t squishy and his weapons are something to be worried about. For up to a range of two is the DT-57, which has critical, pierce 1 and versatile – and allows you to roll two white and two black dice. Nothing to sniff at but get him into melee and he uses his trophy lightsabers – still with critical, pierce 2 and impact 2 – but you will now be rolling four black, two white and two red dice. This feels very thematic to how we always view Grievous. You don’t want to be up against him with a weak squad. Then we come to the keywords that he carries. Block means Grievous has even more of a chance against attacks; Entourage: IG-100 Magna Guard makes all the sense in world; Immune: Pierce is going to frustrate your opponent no end; Jedi Hunter instantly gives you a target to aim for; Relentless means Grievous is going to be swift and still attacking out on the battlefield and finally Scale, well, I think we can all see Grievous running on his arms and legs like he does in Revenge of the Sith. All in all, this is a leader that seems very strong, very thematic and very ready to take on small units or characters. In other words, I can’t wait to see how it operates on the battlefield. Of course, you can add upgrades, but as none of the ones included in the box relate directly to Grievous, I’ll leave them until after looking at the other units. Suffice to say, I’m already impressed.
Next up are the B1 battle droids. With thirty models included in the box, I think I was being very naive to think that this would mean that there was the possibility of creating three units – how wrong I was! These droids are going to be forming the backbone of any Separatist army and in the box, you get two complete ones. The unit – at its absolute basic – is thirty-eight points for a unit of six models. This seems value for money, and I like that the small unit version is available as I think it’s going to be very useful when you have a few points here and there to spare. That said, I do wonder if two units of battle droids in the long run is going to be enough! I guess I’ll need to play a few games with them first before I make that judgement! Whether in melee or ranged up to three, they are rolling one white dice. Not the best but for the points, am I really surprised? They come with two keywords: AI Attack and Coordinate Droid Trooper. The first means that the droids are going to attack for their first action if they are not within three of a commander or have a face up order token. Not necessarily problematic but might restrict battle plans a little. The latter allows coordination with droid trooper units, which certainly could be helpful, particularly if playing with lots of battle droid units. On the absolute basic unit, the droids don’t seem that great, and neither should they. They look like they work exactly as they do in the movies, and I am all for it. So, what upgrades come in the box to make this unit better? Battle Droid Squad allows you to add seven (yes, more models than the starting unit itself) to the unit for the same points the unit costs (thirty-eight). That suddenly means your squad is at thirteen and gains the keyword Indomitable. To me, this seems like an absolute essential upgrade, giving you numbers to really put some pressure on your opponent. The unit might not be able to do much, but they are certainly going to be able to slow the enemy while you get better units into place. The other two upgrades you can give are the E-60R B1 battle droid (eighteen points for a rocket launcher) and the E-5C B1 battle droid (sixteen points for a three black dice blaster rifle). I’m glad these options are there and I could see that they could be useful. However, I’d need to carefully consider what I’m using the squads for. If they are for causing damage, the upgrades are worth it. If they are for annoying the enemy, I think I’d be better taking a normal unit without upgrades for practically the same points cost. But that is also the point. This unit has some versatility in terms of points cost and use on the tabletop. Add to the fact that they seem very thematic and it’s another success for this starter set.
B2 super battle droids cost sixty-four points for three models. That cost, I’m not going to lie, seems steep. That’s almost the same cost as thirteen battle droids! So, what are you getting? Same keyword as the B1 battle droids (AI: Attack) and… nothing more on that front. Yet when you look at their stats, things become much clearer: two health, red defense die and for attacking, a range of two with two black dice or a range of one with a red dice. These things are going to be hitting a lot and doing some damage. But even at two health, three models are still fairly easy to take down, so what upgrades can you have? The expensive one is seventy-seven points, adding four models to the unit and giving the unit Indomitable. It makes this unit a lot more expensive but also deals a lot more damage. The other two upgrades that add a model seem a lot more favorable to me than the B1 upgrades: B2-HA battle droid (thirty-two points, rolling two red and one white device with Blast, Cycle and Impact 2) and B2-ACM battle droid (twenty-four points for a heavy arm cannon that rolls three red dice – yes please!). Clearly there must be a balance between units, needing the base of B1s counterbalanced with the units that are going to pulverise your opponent.
That leaves the droidekas. They are sixty points for two of them. They do come with three wounds, but they are only rolling white defense dice. Their cannons have a range of three, roll one red and two black dice and come with the keywords Fixed Front, Immune Deflect and Suppressive. The cannons are exactly what I want from seeing them in the films and television shows. I think they will take some getting used to, but once you have, your opponent may want to avoid these. However, there is that problem of then being squishy, maybe the keywords make up for it? AI: Attack, Move is perfect for these guys. This is how they respond in The Phantom Menace and I can already visualise them attacking Qui-Gon and Obi-Wan in the opening scenes. This though, combined with their Fixed: Front definitely is going to be a learning curve with them. Shielded 4 and Generator 1 is what stops these droids being squishy. They can stop attacks and regenerate one at the end of each turn. Used right and these are going to be around during the game for a while. Wheel Mode allows the droidekas to move three but they can’t then use their shields. It makes sense but also allows them to enter or leave battle quickly. Again, I think this really is going to be one of those units where it’ll take a game or two to figure out how to best use them. I love how thematic they are, but they are going to take some careful planning.
Three upgrades remain in the box that you can use with several of the units, depending on how you plan to use your units on the tabletop. The cheapest at six points is tenacity. This allows a unit with a wound or a defeated miniature to add a red dice to the attack pool for a melee attack. I’m not going to lie, Grievous comes instantly to mind! Recon Intel costs eight points and gives a unit Scout 1. Finally, there is HQ Uplink for ten points, allowing a unit to issue an order to itself. The upgrades don’t seem as vast as the Imperial and Rebellion starter sets but then again, these are droids we’re dealing with, how many upgrades can they really take?

I’m already impressed with the starter set. Everything about this box screams thematic and I’m really eager to try them out on the tabletop. Before I could do that though, I needed to build all these droids – including t…h…i…r…t…y B1 battle droids – this was going to take some time! Scanning the QR code on the included leaflet, I loaded up the pdf on the AMG website and got to work.
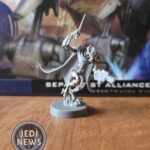
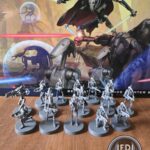
First up to be built was General Grievous. I was thinking that this was a pleasant way to ease my way into the start of building this set but I was already presented with a decision: how did I want to build Grievous? There are two ways to go with the build. The first is to build him as he is on the box art and on the back: Four arms out with lightsabers ignited. The second is a bit more conservative, with two arms out, one with a blaster, the other with the lightsaber. I like that there are two options, particularly considering how we see Grievous in Revenge of the Sith. But this did give me a dilemma. I’ll be honest, Grievous looks better with four lightsabers. There is something so imposing about the character when he has this look that it should be an easy decision to go with this pose. However, this isn’t a display piece, this is a gaming piece. A piece that was going to be transported, that was going to be moved about on a tabletop and yes, have other models surrounding it. This would mean it would have all the usual knocks and bumps you’d expect from a miniature in a game like this. What is the first thing to always get broken in a Star Wars game – the lightsabers. They are thin, easy to hit with hands or models and when you try to glue them back on, are a nightmare. As I was thinking all of this, I already knew that my decision had been made. Cool is one thing, but staring at a model you’ve spent time painting, broken didn’t thrill me either. It was the blaster and lightsaber pose! What is useful for this review is that I could also show you – the reader – what the other pose looked like too. Starting to glue the pieces together, I remembered from Shatterpoint why I hated droids – they are a nightmare to put together. Although there are grooves for the pieces, the very slight angles just never seem to help me line these pieces up as well as I hoped. With Grievous, it started with the foot. The peg just went in any way I placed the foot. Looking at the instructions, which were a lifesaver, I realised the more open toes were near the front and used that as my guide. These pieces are very thin and very awkward in your hand to get into just the right position. I was already dreading all those B1s! The second foot was much easier but instead of building the leg, attaching the foot and then the base, I went the other way around to make sure everything lined up correctly – attach the foot to the base and then place the leg on. Attaching the legs onto the body seemed to go equally well, but I was starting to see just how flimsy Grievous was going to be, not only that, but he is only going to have one point of contact with the base. Before painting him, I might need to change that. With the head, make sure you have the longer of the pegs for the neck piece going into the head itself as the shorter one will fit into the head but the longer won’t go into the body. It fits perfectly when you get the right combination. The arms I thought were no problem and was breathing a sigh of relief until I came to the cloak. I was letting the glue properly set for the pieces before moving onto the next step because of how flimsy the pieces were, but I wouldn’t do that for the last stages. The arm with the lightsaber I thought I had in the perfect position. When I put the cloak on – which there is a bit that needs to sit flush with the body – it didn’t fit quite right. Thankfully the arm wasn’t completely dry, and the arm could move to how it should be. While it’s frustrating, I was actually very glad of the cloak as the final sort of quality check. The General looks great when finished and now I can see the actual model. I’m so glad I went with the option that I did. It captures the character well and the cloak adds that little bit of something.
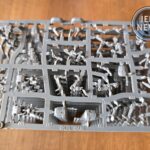
If Grievous wasn’t stressful enough, it was time to move onto the B1s… all thirty of them. I took a deep breath and started on droid A. I felt like I was in a dream. This was going far too easy and the complete opposite to what I had just experienced with Grievous. Within a few minutes, droid A was together, both in fact, with no fuss, no mess and two fantastic models. The body is all moulded together which helps hugely, the arms joined together by the macro binoculars and the additional pieces seamlessly add to the model. It was a real joy doing the model and I think it looks fantastic. Maybe this was panic over!
Now to be fair, there are only two A models to make. I moved onto model B and realised, looking down that long stack of sprues, that it was time for the production line; I needed to make six of this model. Thankfully this was very easy to do, and I did make all six simultaneously. The only real difficulty I had was with the arms. These I had to glue at the same time and position while the glue was still setting. It was finicky but not to the level of Grievous. I soon had six more droids to my growing force!
Model C I was more worried about because the legs needed attaching to give the droid a kneeling position. I shouldn’t have been concerned. These weren’t the flimsy joints like on Grievous, these were solid, could only fit one-way pegs. It made the whole thing so easy to put together. I felt like this was a completely different set I was building from the first model and in some ways, I wish I had started with the battle droids! Yes, the arms are annoying, but I did find with this model, that gluing and holding the right arm firmly in place, and then maneuvering the left arm worked really well. When it came to doing models D and E, the exact same set-up was there, first the head, the legs, slightly fiddly arms and backpack. It went very smoothly constructing so many battle droids and I have to say I was very impressed with how the joints were all done. I want to say I had it done in no time, but I was there a while! With these four models done, I only had four more droids to assemble.
These last four droids are the two upgrades that can be added to each squad: the rocket launcher and the blaster rifle. Model F is the latter of the two and both pretty much follow the same construction as the rest of the droids. The only difference I found was the rocket droid; I glued his left arm on first as the right sits directly on top of it. It might sound silly, but what I really like about model F is the fact that his normal blaster is on his backpack, as if the blaster rifle might not be enough. It is a small detail but one that I really love. With those four droids done the B1s were finally finished. I was not too exhausted from doing so many, but I was very happy to move onto a different type of droid.
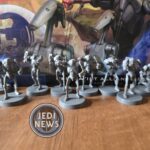
Next in the instructions were the B2 Super Battle droids. These are very easy to put together, mainly because they are thicker than the B1s but also because they have their weapons built in, there are no two-handed weapons. In terms of variations, you can build droids B and C with either outstretched right arms – like they are or going to be firing – or held up, as if in standby mode. While it would have been welcome to have all the droids do this, it’s far more important with droid B. There are nine super battle droids: one each of droids A, D and C; four of droid B and two of droid E. To be able to mix the most common droid up, the variation was most welcome. With all the arms, they are a simple peg, meaning you can position them somewhat freely. This again allows for suitable differences in the drops to give your unit some variation. For a droid that for all intents and purposes is the same mode, the unit looks fantastic when lined up. Having a mixture of arms up and down just adds to this unit feel and I really like how they look and capture the familiar droid.
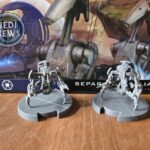
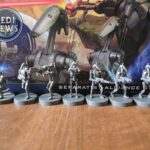
Last but certainly no means least are the two droidekas. There are technically only two, but you make four models, one of each standing (which are slightly different models) and two in the rolling position (these are the same). One just must look at the instructions to understand that these are rather more complex than the other droids. I don’t know whether I should be thankful they’re last or exhausted! Following through with model A, there is a lot going on. You can’t help but appreciate the time and detail that has gone into this model, there’s lots. That said, it is one you really must take your time with. Tubes need placing in the correct slots and you are sometimes second guessing yourself to where pieces fit. When you figure it out, it’s obvious but this is certainly a model that requires a delicate touch. I did notice that most of the parts are labelled both A and C, which makes me think how much difference there is between the two models.

Having just done A, I skipped the model Bs to go straight to model C. The build is identical and other than perhaps a very slightly different orientation of the blasters, I can’t see any difference between the two. It’s not a complaint, I just don’t quite understand why they are labelled differently with different instructions.
With the two ‘standing’ models to do, it was the two rolling ones. These aren’t much easier than the standing ones. Patience is certainly needed! The only part where I really had to think as I didn’t think the instructions were too clear was for parts B07 and B08, there is a gap at the last part of the spine that these fit into. It took me a while to find it and realise what I needed to do. The blasters are also a bit of a fiddle. You must line the blasters up, which don’t really have a peg and then the wire on the other side, it gets very frustrating. One thing I would absolutely change is putting part B10 on. Make sure you do this during step three; it will save a lot of huffing and puffing. Now thankfully, they look just as impressive as their standing counterparts. They are so detailed that I’m not even sure how I’m going to begin to paint them!
With that, the army was complete, standing and ready. These look like an incredible unit and I’m really looking forward to playing with them, particularly as they seem so different from all the other starter forces. There is a lot here just in terms of models. Throw in all the cards, tools and rules to play the game and you can very quickly see that this starter set is incredible value for money. If you’re looking to dip your toe into Legion, or just want droids to build and paint, this set has everything you need to get started; I can’t recommend it enough. Stay tuned for a review of how the set does on the tabletop, I just need to build the Republic starter set first!
The Star Wars Legion: Separatist Alliance Starter Set from Atomic Mass Games retails at £84.99. It is available now from high street gaming stores and online retailers including Amazon UK and Amazon US.


